


🔬 3D Anatomy Series - Human Body Replicas to Enhance Teaching!
August 26, 2025
Discover premium 3D-printed human anatomy replicas, free from ethical restrictions and designed for high-impact teaching.
The groundbreaking anatomy series by Erler-Zimmer features a unique and unmatched collection of colored human body replicas, specifically designed to enhance teaching and learning. This premium collection of highly accurate human anatomy was created directly from radiological data or real specimens using the latest imaging technologies. The 3D Human Anatomy Series from Erler-Zimmer offers a cost-effective way to meet your specific teaching and demonstration needs across the entire medical, health sciences, and biology curricula.
Each body replica has been rigorously reviewed by the expert anatomical team at Monash University to ensure the anatomical accuracy of the final product. Since these replicas do not consist of real human tissue, they are not subject to restrictions on transport, import, or use in educational institutions that do not have permission to work with cadavers. The exclusive 3D Anatomy Series avoids these and other ethical issues that arise when working with plastinated human remains.
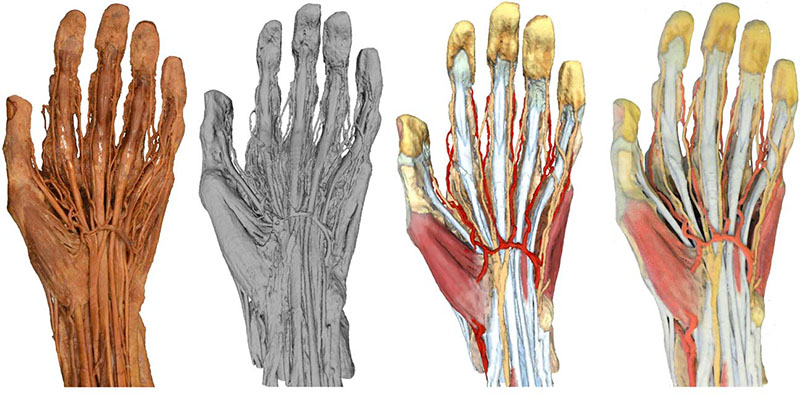
Direct comparison of cadaver specimens with the 3D Anatomy Series!
Our series at a glance:
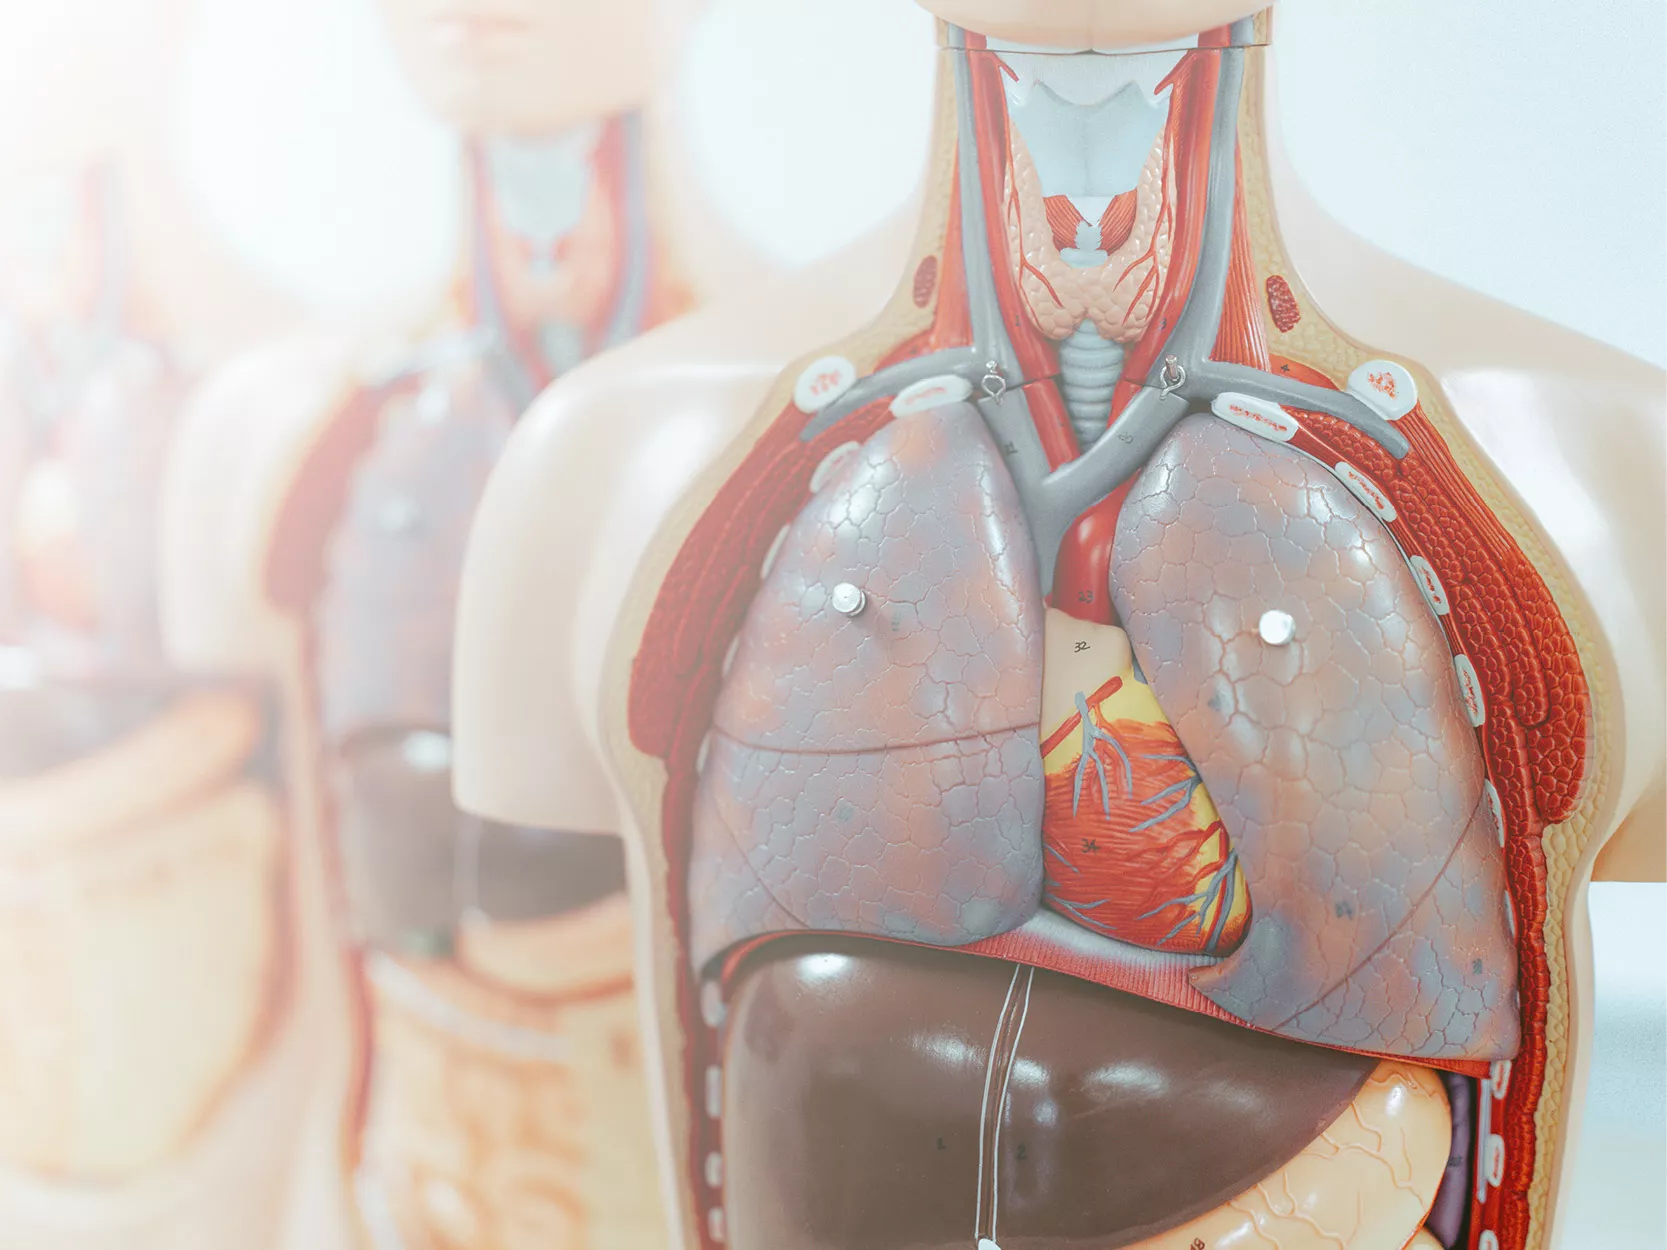
Anatomy Series 1.0
 The Anatomy Series 1.0 by Erler-Zimmer is a collection of highly detailed 3D-printed anatomical models specifically created with didactic use in mind. The Series 1.0 focuses on clarity, structure, and educational value—making it ideal for teaching foundational anatomy.
The structures are color-coded and labeled to highlight key anatomical features, allowing students to easily understand complex relationships between systems, organs, and tissues. The models are categorized into key anatomical regions such as the head, torso, limbs, and thorax. They offer a clean, structured representation of human anatomy.
In short, Anatomy Series 1.0 is a pedagogically optimized tool that bridges the gap between simplified teaching models and high-fidelity realism, offering both accuracy and accessibility.
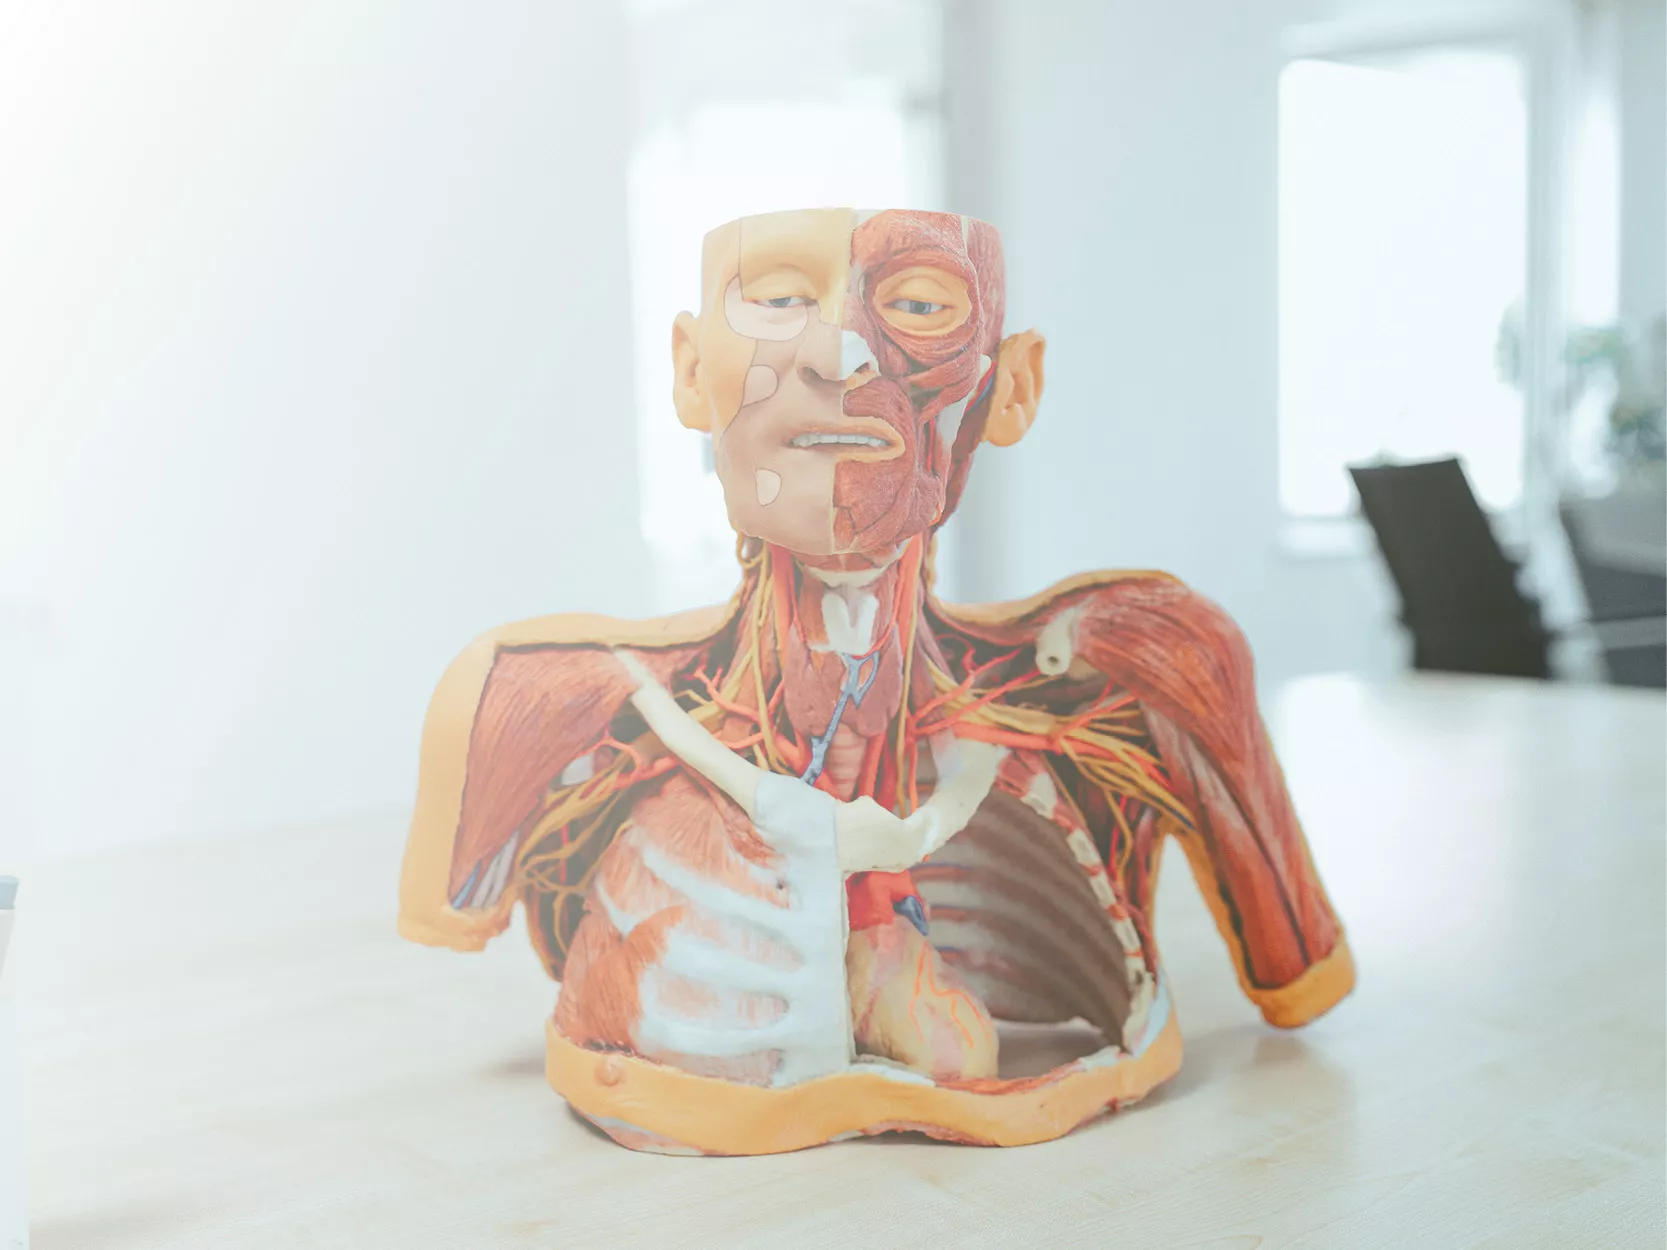
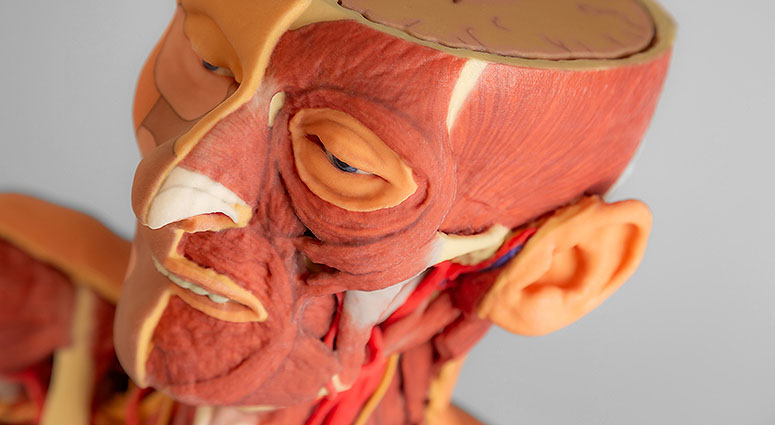
Anatomy Series 1.1
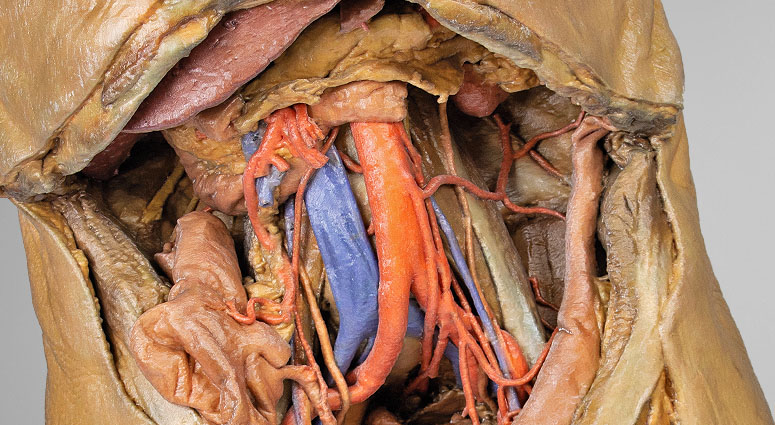 Unlike the more stylized and didactically simplified Anatomy Series 1.0, the Anatomy Series 1.1 by Erler-Zimmer prioritizes anatomical realism by preserving natural variations found in actual human bodies. These 3D-printed models are created from high-resolution scans of real specimens and are minimally edited, offering a raw and authentic representation of human anatomy.
This makes Anatomy Series 1.1 especially valuable for advanced learners, clinical training, and realistic case-based teaching. Series 1.1 presents the anatomical complexity and individuality that students and professionals will encounter in real-life scenarios.
Anatomy Series 1.1 is ideal for those who seek to explore anatomy as it truly appears—complete with its subtle differences, asymmetries, and clinical relevance.
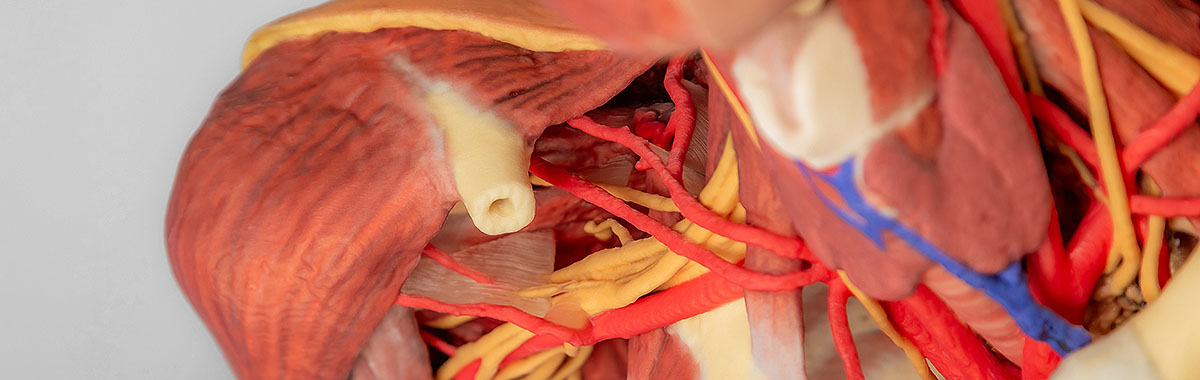
Pathology Series 2.0
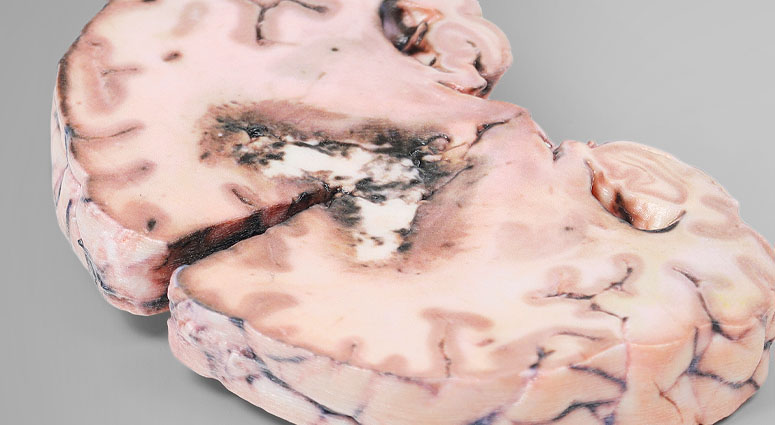 The Pathology Series 2.0 by Erler-Zimmer offers a premium collection of full-color, 3D-printed anatomical models that showcase real pathological conditions. Created from authentic scans or real specimens, each model is developed in collaboration with Monash University to ensure medical accuracy and educational relevance.
Unlike conventional plastic models, these replicas preserve the complexity and variation found in real cases—without the legal, ethical, or logistical challenges of using cadaveric material. This makes them ideal for medical schools, universities, and training centers that want to teach pathology in a realistic yet accessible way.
Covering systems such as the brain, cardiovascular, respiratory, digestive, renal, reproductive, and musculoskeletal anatomy, each model includes detailed labeling to support clinical teaching and student self-study.
Veterinary Series
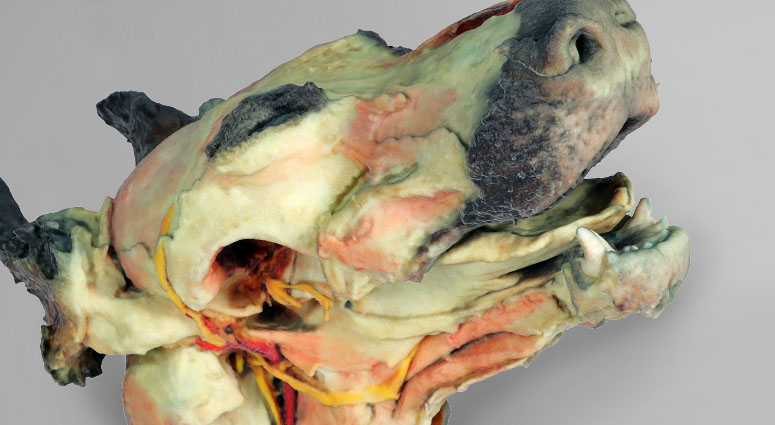 Erler-Zimmer’s Veterinary 3D Anatomy Series offers highly detailed, 3D-printed anatomical models and simulators designed specifically for veterinary education. These tools provide realistic, hands-on learning without the need for live animals, making them ideal for teaching anatomy, clinical procedures, and diagnostics.
The collection includes advanced models like the dissected canine head, showing both superficial and deep structures—from muscles and salivary glands to cranial nerves, arteries, and pharyngeal anatomy. Each model is based on real anatomical data and developed with expert input to ensure accuracy and clarity.
How a 3D model is created – A look behind the scenes at Erler-Zimmer
Hands-on anatomy – realistic, detailed and didactically well thought-out: Erler-Zimmer's 3D anatomy models stand for the highest precision in medical education and training. But how is such a model actually created? What technologies are behind the manufacturing process? In this article, we give you an insight into the creation of Erler-Zimmer's 3D anatomy series – from digital planning to the finished model ready for dispatch.
🛠 Step by step: How a 3D anatomical model is created at Erler-Zimmer
1. Digital modelling – the basis of every anatomical model
The first step is to create a carefully developed 3D model based on real anatomy. This is done using either high-resolution medical scans or precisely modelled data. Our experts use specialised 3D software to faithfully reproduce every structure, from nerves and muscles to the smallest vessels.
The digital model is then broken down into individual layers. This creates the print file, which contains all the information needed for the 3D printer.
2. Transfer to the printer
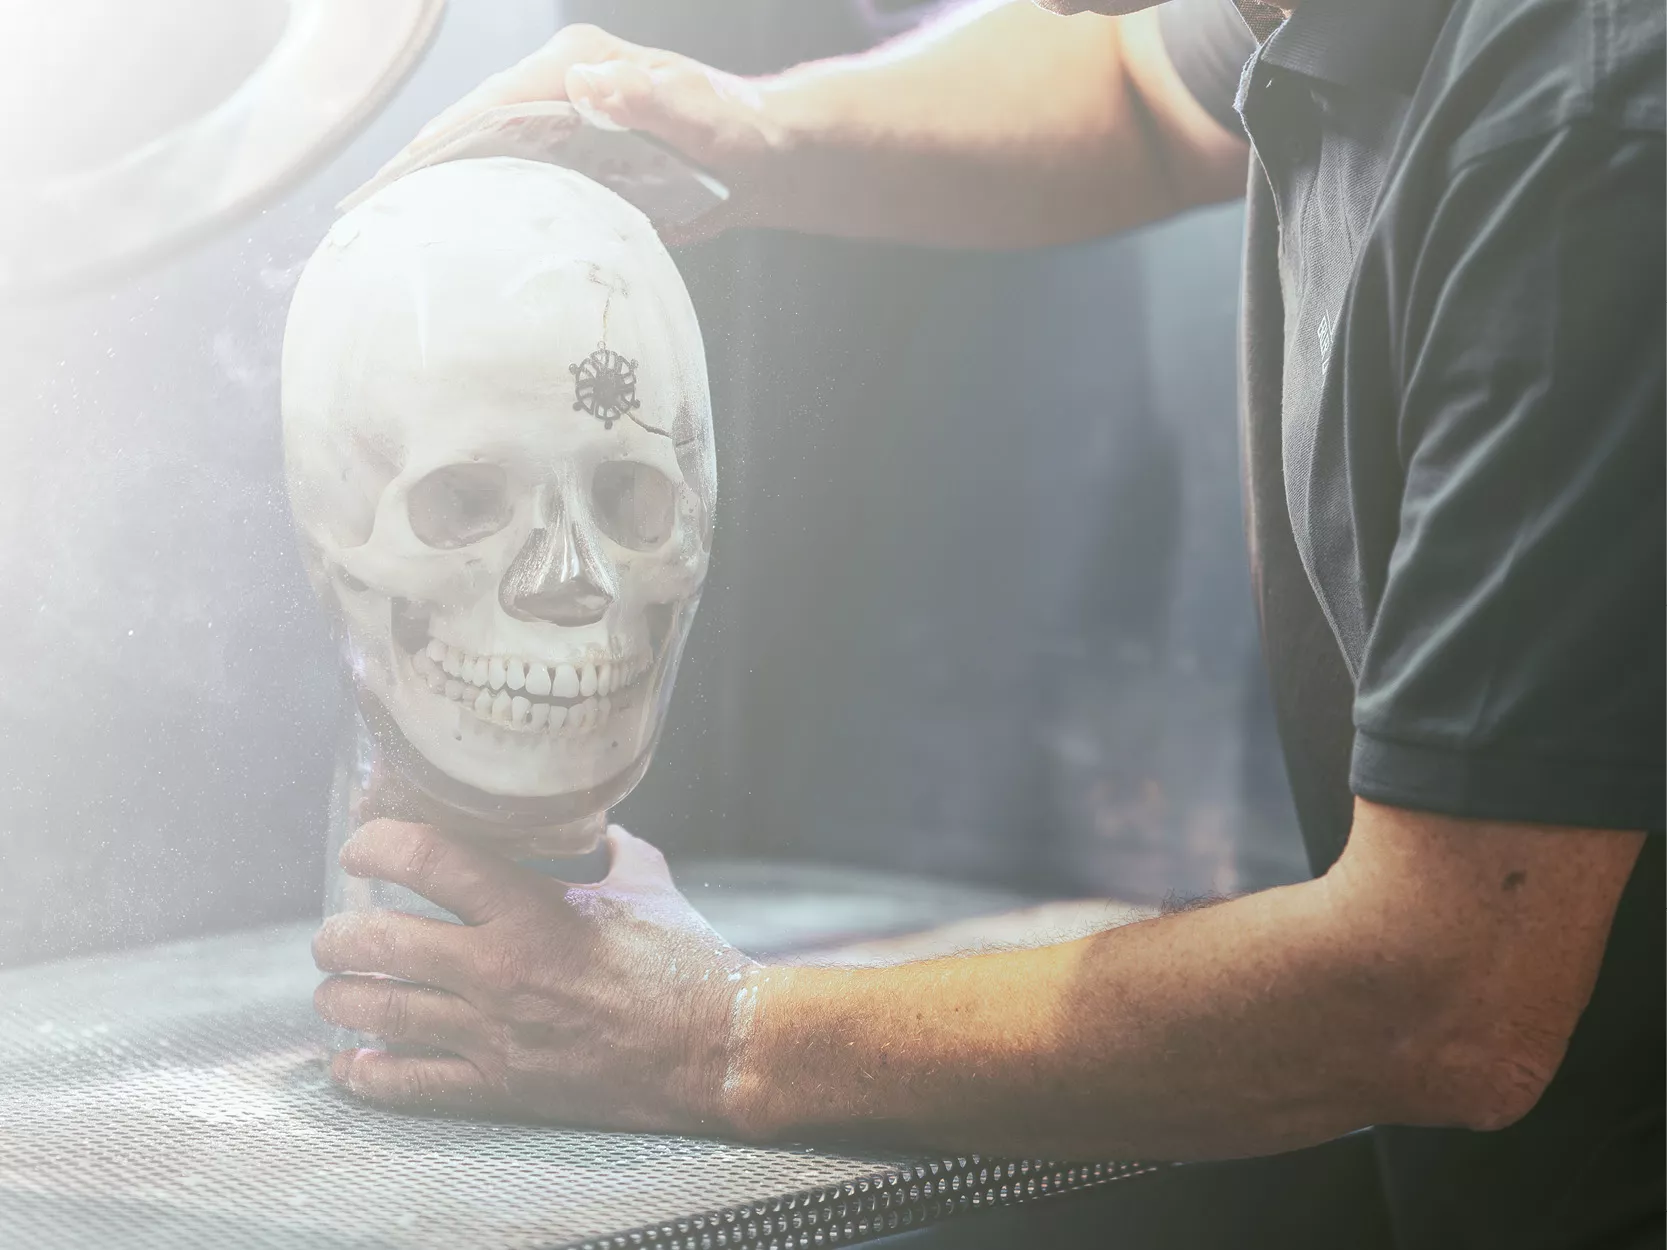
The finished print file is transferred to the high-resolution 3D printer. Erler-Zimmer uses state-of-the-art equipment that is specially designed for producing the finest anatomical details. The printer reads the data layer by layer and begins to build up the model.
3. Layer-by-layer build-up in liquid – printed in colour
The 3D anatomical models are made from a special light-sensitive synthetic material. The model is created layer by layer by precisely curing the liquid. Thanks to multi-colour printing processes, anatomical structures can be realistically represented in different colours – without the need for subsequent painting. This creates a particularly lifelike and vivid impression, ideal for use in teaching and practice.
4. Curing with UV light
During each layer build-up, the liquid paint is specifically irradiated with UV light so that it hardens immediately. This process is carried out with the utmost precision – even the finest anatomical structures are preserved. Depending on the model, hundreds to thousands of layers can be superimposed to build up the complete object. The printing process for a model can take up to several days.
5. Cleaning and removal of the support structures
After the printing process, the model is carefully removed from the printer and thoroughly cleaned in a special liquid. This removes any excess material. Support structures that were necessary during printing are then carefully removed without damaging the fine details.
6. Drying and post-curing
After cleaning, the final curing process takes place. The model is dried and fully cured in a special UV chamber to ensure maximum stability and durability. This ensures that the model retains its shape and colour even when used frequently in lessons or demonstrations.
7. Packaging and shipping
Finally, a thorough quality control check is carried out. Each model is checked for print quality, colour accuracy and anatomical correctness. It is then packed in shock-proof packaging and prepared for shipping – whether to universities, clinics or medical training centres worldwide
The production of a 3D anatomical model is a highly complex process that combines modern technology with anatomical expertise. Thanks to the use of 3D printing and colour-accurate representation, Erler-Zimmer creates learning models of the highest standard – precise, robust and rich in detail.
Whether for medical students, nursing training or anatomy lessons, the 3D series from Erler-Zimmer brings medical knowledge to life.
👉 Ready to take your training to the next level?
Contact us here.

The groundbreaking anatomy series by Erler-Zimmer features a unique and unmatched collection of colored human body replicas, specifically designed to enhance teaching and learning. This premium collection of highly accurate human anatomy was created directly from radiological data or real specimens using the latest imaging technologies. The 3D Human Anatomy Series from Erler-Zimmer offers a cost-effective way to meet your specific teaching and demonstration needs across the entire medical, health sciences, and biology curricula.
Each body replica has been rigorously reviewed by the expert anatomical team at Monash University to ensure the anatomical accuracy of the final product. Since these replicas do not consist of real human tissue, they are not subject to restrictions on transport, import, or use in educational institutions that do not have permission to work with cadavers. The exclusive 3D Anatomy Series avoids these and other ethical issues that arise when working with plastinated human remains.
Direct comparison of cadaver specimens with the 3D Anatomy Series!
| Advantages 3D printed Anatomical Models | Human Cadavers / Plastinates |
|---|---|
| ✅ Anatomically accurate & identical to real specimen | ❌ Ethical issues |
| ✅ No ethical issues - no real human body parts | ❌ Cadavers cost a lot of money |
| ✅ Raesonably priced | ❌ High cost for establishing your own plastination suite |
| ✅ Available within a short lead time | ❌ Wet specimens cannot be used in uncertified labs |
| ✅ Reproducible, several identical prints can be used as a classroom set | ❌ Dissection of cadavers is a lot of staff time and that is a cost |
| ✅ Can be produced in different sizes to cater for the needs of the teacher | ❌ Storage of cadaver material needs special refrigeration etc. which has coast |
| ❌ If you want another specimen/plastinate you have to start all over again |
Our series at a glance:
Anatomy Series 1.0
The Anatomy Series 1.0 by Erler-Zimmer is a collection of highly detailed 3D-printed anatomical models specifically created with didactic use in mind. The Series 1.0 focuses on clarity, structure, and educational value—making it ideal for teaching foundational anatomy.The structures are color-coded and labeled to highlight key anatomical features, allowing students to easily understand complex relationships between systems, organs, and tissues. The models are categorized into key anatomical regions such as the head, torso, limbs, and thorax. They offer a clean, structured representation of human anatomy.
In short, Anatomy Series 1.0 is a pedagogically optimized tool that bridges the gap between simplified teaching models and high-fidelity realism, offering both accuracy and accessibility.
Anatomy Series 1.1
Unlike the more stylized and didactically simplified Anatomy Series 1.0, the Anatomy Series 1.1 by Erler-Zimmer prioritizes anatomical realism by preserving natural variations found in actual human bodies. These 3D-printed models are created from high-resolution scans of real specimens and are minimally edited, offering a raw and authentic representation of human anatomy.This makes Anatomy Series 1.1 especially valuable for advanced learners, clinical training, and realistic case-based teaching. Series 1.1 presents the anatomical complexity and individuality that students and professionals will encounter in real-life scenarios.
Anatomy Series 1.1 is ideal for those who seek to explore anatomy as it truly appears—complete with its subtle differences, asymmetries, and clinical relevance.
Pathology Series 2.0
The Pathology Series 2.0 by Erler-Zimmer offers a premium collection of full-color, 3D-printed anatomical models that showcase real pathological conditions. Created from authentic scans or real specimens, each model is developed in collaboration with Monash University to ensure medical accuracy and educational relevance.Unlike conventional plastic models, these replicas preserve the complexity and variation found in real cases—without the legal, ethical, or logistical challenges of using cadaveric material. This makes them ideal for medical schools, universities, and training centers that want to teach pathology in a realistic yet accessible way.
Covering systems such as the brain, cardiovascular, respiratory, digestive, renal, reproductive, and musculoskeletal anatomy, each model includes detailed labeling to support clinical teaching and student self-study.
Veterinary Series
Erler-Zimmer’s Veterinary 3D Anatomy Series offers highly detailed, 3D-printed anatomical models and simulators designed specifically for veterinary education. These tools provide realistic, hands-on learning without the need for live animals, making them ideal for teaching anatomy, clinical procedures, and diagnostics.The collection includes advanced models like the dissected canine head, showing both superficial and deep structures—from muscles and salivary glands to cranial nerves, arteries, and pharyngeal anatomy. Each model is based on real anatomical data and developed with expert input to ensure accuracy and clarity.
How a 3D model is created – A look behind the scenes at Erler-Zimmer
Hands-on anatomy – realistic, detailed and didactically well thought-out: Erler-Zimmer's 3D anatomy models stand for the highest precision in medical education and training. But how is such a model actually created? What technologies are behind the manufacturing process? In this article, we give you an insight into the creation of Erler-Zimmer's 3D anatomy series – from digital planning to the finished model ready for dispatch.
🛠 Step by step: How a 3D anatomical model is created at Erler-Zimmer
1. Digital modelling – the basis of every anatomical model
The first step is to create a carefully developed 3D model based on real anatomy. This is done using either high-resolution medical scans or precisely modelled data. Our experts use specialised 3D software to faithfully reproduce every structure, from nerves and muscles to the smallest vessels.
The digital model is then broken down into individual layers. This creates the print file, which contains all the information needed for the 3D printer.
2. Transfer to the printer
The finished print file is transferred to the high-resolution 3D printer. Erler-Zimmer uses state-of-the-art equipment that is specially designed for producing the finest anatomical details. The printer reads the data layer by layer and begins to build up the model.
3. Layer-by-layer build-up in liquid – printed in colour
The 3D anatomical models are made from a special light-sensitive synthetic material. The model is created layer by layer by precisely curing the liquid. Thanks to multi-colour printing processes, anatomical structures can be realistically represented in different colours – without the need for subsequent painting. This creates a particularly lifelike and vivid impression, ideal for use in teaching and practice.
4. Curing with UV light
During each layer build-up, the liquid paint is specifically irradiated with UV light so that it hardens immediately. This process is carried out with the utmost precision – even the finest anatomical structures are preserved. Depending on the model, hundreds to thousands of layers can be superimposed to build up the complete object. The printing process for a model can take up to several days.
5. Cleaning and removal of the support structures
After the printing process, the model is carefully removed from the printer and thoroughly cleaned in a special liquid. This removes any excess material. Support structures that were necessary during printing are then carefully removed without damaging the fine details.
6. Drying and post-curing
After cleaning, the final curing process takes place. The model is dried and fully cured in a special UV chamber to ensure maximum stability and durability. This ensures that the model retains its shape and colour even when used frequently in lessons or demonstrations.
7. Packaging and shipping
Finally, a thorough quality control check is carried out. Each model is checked for print quality, colour accuracy and anatomical correctness. It is then packed in shock-proof packaging and prepared for shipping – whether to universities, clinics or medical training centres worldwide
The production of a 3D anatomical model is a highly complex process that combines modern technology with anatomical expertise. Thanks to the use of 3D printing and colour-accurate representation, Erler-Zimmer creates learning models of the highest standard – precise, robust and rich in detail.
Whether for medical students, nursing training or anatomy lessons, the 3D series from Erler-Zimmer brings medical knowledge to life.
👉 Ready to take your training to the next level?
Contact us here.


